Surface Defects of Screws according to UNI EN 26157-1 and UNI EN 26157-3
Introduction
Screws are essential mechanical components that play a crucial role in the structural integrity and functionality of a wide range of products and industrial applications. The UNI EN 26157-1 and UNI EN 26157-3 standards define quality requirements for screws, including specific criteria for acceptable and unacceptable surface defects. This document explores the main surface defects that may occur during screw production, analyzing their causes, effects, and inspection methods to ensure compliance with the standards.
Types of Surface Defects
Surface defects in screws can be categorized into different types, each with specific characteristics and implications for the screw’s functionality. Below are the main defects described.
Surface Porosity
- Description: Surface porosity appears as small cavities or holes on the screw surface.
- Causes: Usually due to improper casting or plating processes.
- Effects: Can compromise the mechanical strength of the screw and its sealing ability.
Burrs
- Description: Burrs are small protrusions or ridges that form on the edges of threads or the screw head.
- Causes: Typically caused by inaccurate stamping or cutting processes.
- Effects: Can hinder proper screwing or cause damage to the threading during use.
Machining Marks
- Description: Tool marks or traces left during the manufacturing process.
- Causes: Tool wear or improper adjustment of cutting tools.
- Effects: Mainly aesthetic, but in some cases, they can reduce corrosion resistance.
Scratches and Dents
- Description: Surface damage caused during handling or transport.
- Causes: Improper handling or inadequate transportation.
- Effects: Can reduce corrosion protection and compromise the aesthetic appearance of the screw.
Corrosion
- Description: Oxidation or rust formation on the screw surface.
- Causes: Exposure to humidity or chemicals during storage or processing.
- Effects: Compromises the durability and mechanical strength of the screw.
UNI EN 26157-1 and UNI EN 26157-3 Standards
The UNI EN 26157-1 and UNI EN 26157-3 standards establish quality requirements for screws, specifying acceptable limits for surface defects.
Surface Defect Compliance Table
| Type of Defect | Admissibility according to UNI EN 26157-1 | Admissibility according to UNI EN 26157-3 |
|---|---|---|
| Surface Porosity | Limited, not in critical areas | Limited, greater tolerance |
| Burrs | Not allowed in functional areas | Allowed to a limited extent |
| Machining Marks | Allowed if they do not affect functionality | Allowed if they do not compromise use |
| Scratches and Dents | Allowed if they do not affect strength | Allowed to a limited extent |
| Corrosion | Not allowed | Not allowed |
Visual Analysis and Inspection Methods
Visual inspection is the primary technique used to identify surface defects in screws. However, other techniques are also used, such as:
- Optical Microscope: For detailed analysis of porosity and scratches.
- Non-Destructive Testing (NDT): Techniques such as radiography or magnetic inspection to detect internal or hidden defects.
- Roughness Measurement: Used to assess the surface and determine the extent of machining marks.
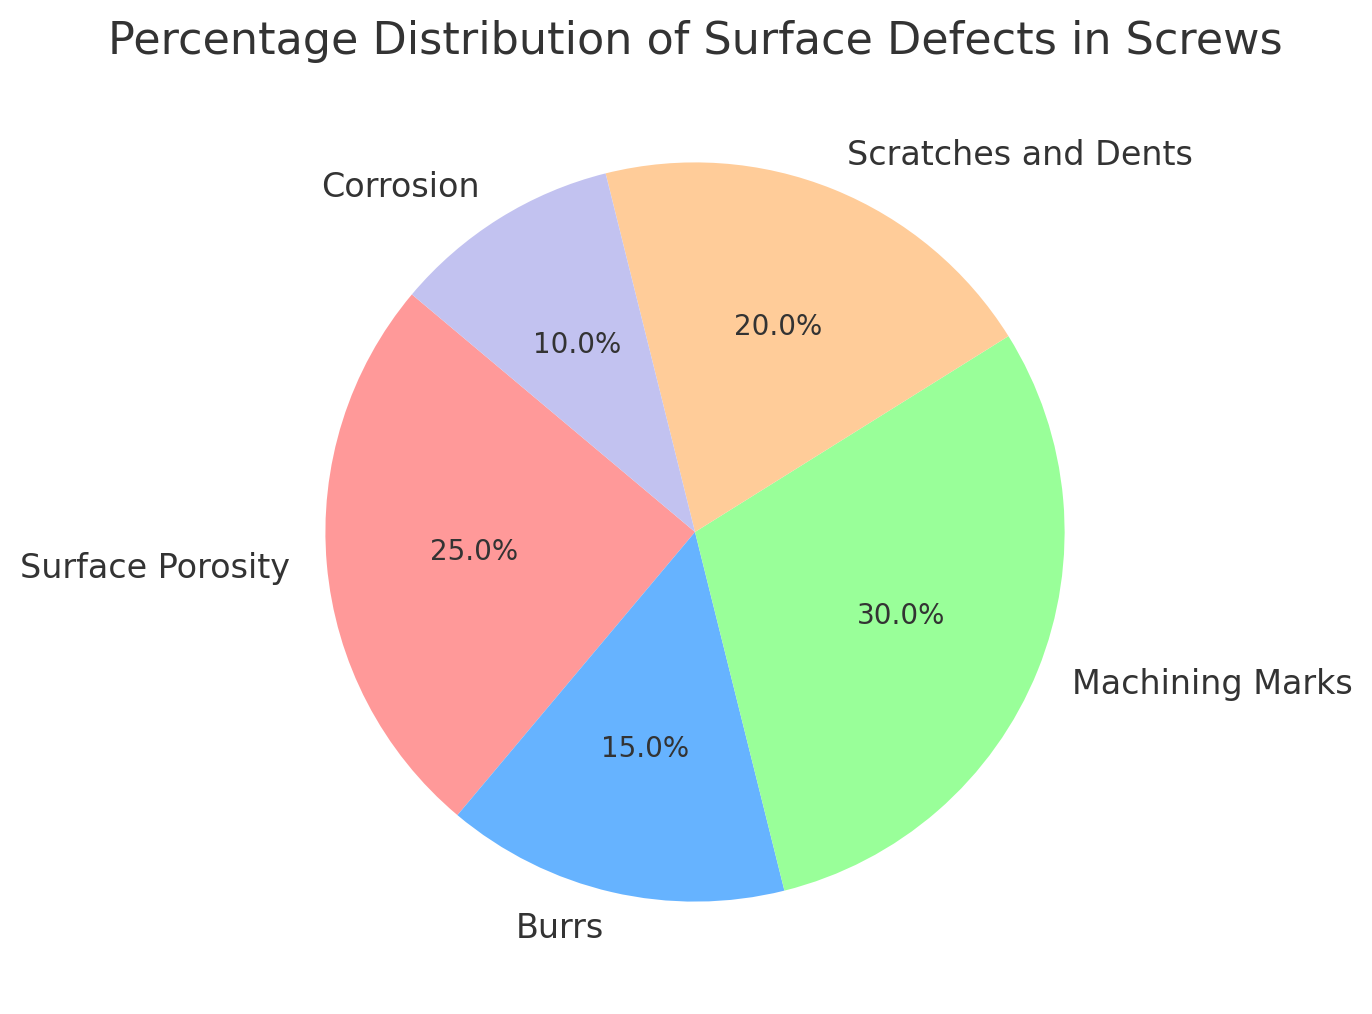
Graph: Frequency of Surface Defects
A graph represents the percentage distribution of the most common surface defects found in screws manufactured according to UNI EN 26157-1 and UNI EN 26157-3 standards. The presented data provide a visual overview of the frequency of these defects, highlighting the importance of rigorous quality control to ensure compliance with technical specifications.

Impact on Quality and Performance
If not properly managed, surface defects can significantly impact the overall quality of screws. For example, excessive porosity can reduce the mechanical strength of the screw, while the presence of burrs can hinder proper screwing, leading to defective assembly. Therefore, it is essential that screws comply with UNI EN specifications to ensure their reliability and durability.
Commercial Conclusion
Strict control of surface defects in screws is not just a regulatory obligation but represents added value for manufacturers aiming to position themselves as high-quality suppliers in the market. The ability to provide screws compliant with UNI EN 26157-1 and 26157-3 standards ensures not only end-customer satisfaction but also reduces costs associated with complaints and returns. Investing in screw surface quality not only enhances brand reputation but also opens new business opportunities, especially in industries where precision and reliability are crucial.


